Sharing Files Made Easy: A Step-by-Step Guide to Online Folder Sharing with Nginx
Table of contents
📔 Introduction
Sharing files with friends and family is a common practice. However, it can be a hassle to share large files over email or instant messaging. In this tutorial, we will show you how to set up a file-sharing server with Nginx, an open-source web server. We will also show you how to secure your server with a free SSL certificate from Let’s Encrypt.
📚 Prerequisites
To follow this guide, you will need:
- A server running Ubuntu 20.04 or newer. We recommend using a DigitalOcean Droplet https://www.digitalocean.com/products/droplets/ with at least 1 GB of RAM.
- A domain name pointed at your server’s public IP address. You can purchase a domain name on Namecheap If you are from Argentina like me I suggest you use nic
- A non-root user with sudo privileges. You can learn how to set up a user with these privileges by following our here https://www.digitalocean.com/community/tutorials/initial-server-setup-with-ubuntu-20-04
📓 Steps
📝 Step 0 — Connect to your server
ssh -i <ssh-key> <user>@<server-ip>
📝 Step 1 — Installing Nginx
In this step, we will install Nginx, the web server that will serve your files to your users.
First, update your server’s package index and install Nginx:
sudo apte update
sudo apt install nginx
After confirming the installation, apt will install Nginx and all required dependencies.
Once the installation is finished, you can check that Nginx is running by typing:
systemctl status nginx
If you see green active (running) in the output, Nginx is running and enabled to start automatically at boot.
📝 Step 2 — Configuring Nginx
In this step, we will configure Nginx to serve files from a directory on your server.
First, create a directory where you will store your files. In my case I'm using a separate disk and the folder is going to be at the root with a folder called public_files
To go there I normally do cd /mnt/public_files/files
Next, we will create a new server block configuration file in the etc/nginx/sites-available directory. We will name the file after your domain name.
sudo nano /etc/nginx/sites-available/files.<your_domain>
Take note files are not necessary here you can use your plain domain, I'll use it like this since I have multiple subdomains.
Now add the following configuration to the file.
server {
    server_name files.<your_domain_name>;
    root <the_directory_you_created>;

    location / {
        autoindex on;
        try_files $uri $uri/ =404;
    }

}
This configuration tells Nginx to serve files from the your_directory directory when someone visits your domain name. And adds the autoindex to show every file inside this directory as a list of items.
Save and close the file when you are finished.
Next, we will enable the server block configuration by creating a symbolic link from the file to the sites-enabled directory, which Nginx reads from during startup:
sudo ln -s /etc/nginx/sites-available/files.<your_domain> /etc/nginx-sites-enabled/
Next, test your Nginx configuration for syntax errors by typing:
sudo nginx -t
If no errors are reported, reload Nginx to apply the changes:
sudo systemctl reload nginx
📝 Step 3 — Uploading Files
In this step, we will upload files to your server. You can upload files to your server using the sftp protocol. If you are using a Mac or Linux computer, you can use the sftp command-line tool.
First, connect to your server using sftp.
sftp <your_username>@<your_server_ip>
Note before connecting you may want to create a simple file just for test purposes like touch example.txt
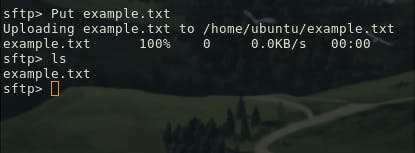
Now we can use the command Put to insert files from our local machine to our remote server

Now know how to do that, you can connect via ssh move that file onto the folder you have your nginx autoindex and share your url!
Here is the final result

🏁 Conclusion
You can have a simple file server host to download those important files whenever you are from any device, I usually keep my CV updated there, some books and stuff I want to teach others. Nginx is awesome so use it!

